Step 2
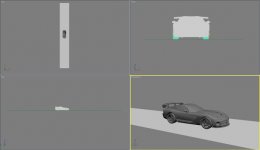
Create a long plane in the TOP viewport. Position the plane so that it lies under the wheels and acts as a road.
Step 3
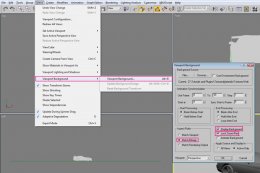
Make sure your perspective view is selected, and go to “Views > Viewport Background > Viewport Background” or (Alt+B). Click on "Files" and load the background image. Use selected settings while loading a background image.
Step 4
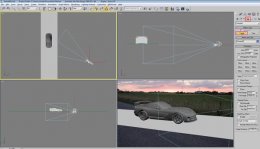
Go to the TOP viewport again, and create a standard Target camera. Don’t worry about it’s position and settings, I will explain this later.
Step 5
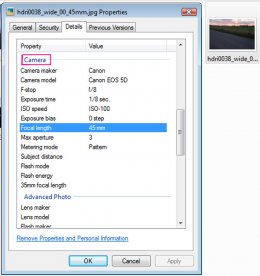
All good back plates contain information about f-stop number, iso, and other important settings. All we have to do to match some of image parameters with the camera we have just created. So right click the image, and under “properties”, go to “details” and scroll down until you see the “Camera” roll out menu. Currently we will match only the "Focal Length" parameter. As you can see, the back plate image has a "Focal Length" value of 45.
Step 6
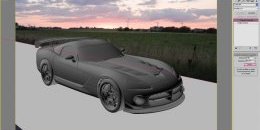
 Back in 3DS Max, go to "Camera Settings" and and change the "Lens" settings to 45. Also, change the perspective view to your camera (C).
Step 7
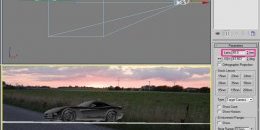
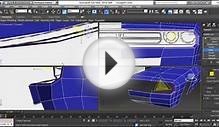
Now, we need to match our perspective with the background image. There are several ways to do that, such as camera tracking etc. I, personally find those methods too complicated, so i use the method of trial and error. What i do is try to match the perspective of road with the background image using camera tools such as "Orbit Camera" and "Pan"(Mouse Middle Click). If you think the car is too small then you can use"Dolly Camera" as well. When you are satisfied with your composition, right click the camera, and go to "Camera correction modifier". Click on "Guess", and it automatically sets the correct perspective. After couple of minutes of experimentation, my viewport ended up like this.
Step 8
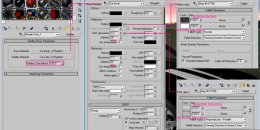
Our scene preparation is now done, so let's get on with the materials and texturing. Assign a "shellac" material to the car body. Under the "Base and Shellac" material option, use "VRayMtl", and put a value of "100" under "Shellac Color Blend". Go back to the Base material and use the settings shown below.
 A Shellac allows you to superimpose one material over another, with the base material being underneath and the shellac material over it. The "Shellac Color Blend" box controls the amount of shellac that gets laid over the base material, and the Subdiv value control the smoothness of material. The more subdivs you have, the material will look noise free in the render, but this will of course increase the render time.
Step 9
For the car body color, go to "Car Color", under Shellac material options, and use the following settings. I decided to give the car body a deep red color, so I used a Falloff gradient under "Diffuse" slot from light red to deep red. If you want a Black carpaint, for instance, then you can simply replace the light red with Grey, and the dark red with black. I have also used Fresnal reflections this time. Fresnel describes the way a surface's attributes change depending on the view angle.
Step 10
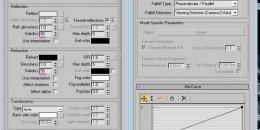
For the windshield material, apply a VRayMtl to the windshields, and use the settings shown below. Note: The reflect parameter controls the reflection of the material. Black means the material will not reflect anything, and white means it will reflect everything in the scene. The refract value gives transparency to the material where white means 100% transparent, and black means 100% opaque. Also, I used a small picture of a Rainbow gradient under the Diffuse slot, you can find a similar one using Google.
 Step 11
For the tire material, apply a VRayMtl and check "BRDF" as "Ward". The BRDF parameters determine the type of the highlights and glossy reflections.
Step 12
For the rims material, apply a VRayMtl using the settings shown. The reflection glossiness controls the parameters of specular reflections in vraymaterial. The lower the value (0.45-0.75), the blurrier the reflections. Also, if you use less values of reflection glossiness, you need to crank up the subdivs, as blurry reflections produce more noise in the render.
Step 13
Now, assign a "Matte/Shadow" material to the road, so that it catches the shadows from the VrayLight and HDRI. Open the "Material Editor", click on "Get Material", select "Matte/Shadow" from the list, and apply it to the road. Use the default settings of the "Matte/Shadow" material.
Step 14
Time to use the HDRI to light up the scene. Press "M" to open the material editor window, and click the "Get material" button. Another window of "Material/Map Browser" will pop up. Select "Bitmap" from the list, and load the HDRI from the browser.
Step 15
Go to the "Lights" menu, select "vray" from the dropdown menu, and create a "VrayLight" above the car using the following settings. You will need to adjust the multiplier value according to your scene. In my scene, a multiplier of "1.5" worked perfectly.
RELATED VIDEO

Share this Post
latest post
-
 Car design.com June 14, 2026
 -
 Automotive power supply Design May 25, 2026
 -
 Become a car Designer May 5, 2026
 -
 Car Design software online April 15, 2026
 -
 Car Designs March 26, 2026
 -
 Automobile, Vehicle March 6, 2026
 -
 Automotive Shop Design February 14, 2026
 -
 Cars Design January 25, 2026
 -
 Top Automotive Design Schools January 5, 2026