
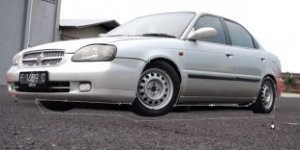
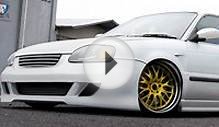
Step 3
Activate move tool and then drag car into background file.
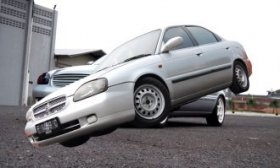
Step 4
Hit Command/Ctrl + T to perform transformation. Rotate car until it covers the original car.
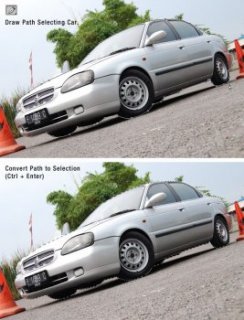
Step 5
In Paths panel, create new path. Use pen tool to draw a path selecting lower part of the car. Hit Command/Ctrl + Enter to convert path into selection and then delete selected areas.
Step 6: Removing Door Handle
This car door is going to use remote. So, let's remove door handle. Select areas next to the door handle using Polygon tool. Hit Command/Ctrl + J to duplicate it to new layer. Place the duplicated layer on top of the door handle. Add layer mask and paint its edges with black until it blends with its surrounding.
Usually, once is just not enough. You will have to repeat this a few times until it really blends and the door's handle is completely disappeared.
Step 7
Repeat previous step to remove rear door handle, gas cap, and turn light.
Step 8: Modify Side Mirror
Select lower part of side mirror. Click Image > Adjustments > Hue/Saturation. Reduce Lightness setting to make it darker.
Step 9
Editing lightness sometimes will decrease contrast. This happens to our side mirror. Activate brush tool and set its brush size to 1 px. Draw a black line on indicated area below.
Step 10: Remove Number Plate
We are going to add custom front bumper. First, we need to remove the car number plate. Activate Clone tool. In the Option Bar, select Sample: All Layers. With this setting, cloning process will be applied on separate layers. Therefore, the original image is unaffected.
Alt-click areas next to the plate number to sample it as clone source. Create new layer and click on the plate number to cover it using pixel from the source clone. To get natural result, I suggest you to use several source clone and reduce Clone tool Opacity from the Option Bar.
 Step 11
There is other method you can use to remove the plate number. Activate brush tool. Alt-click similar color to select it and then paint over the areas. This method is relatively faster than cloning, but you must be very careful in selecting the color. Keep in mind that there are no solid color in real life.
Step 12: Front Bumper
After successfully removing plate number. It's time to add custom bumper. Use brush tool to paint black on the bumper areas. Set foreground color to dark gray and then draw basic shape inside the bumper. Create new layer and convert it to Clipping Mask. This way, everything we paint will goes inside the shape. Use brush tool to manually draw highlights and shadow.
Step 13
In animation below, you can see the full process of drawing the front bumper.
Step 14
Let's add lowering kit by lengthening its front bumper. Draw the basic shape using pen tool. Convert it to selection and then fill it with #8f8f8f.
Step 15
Create new layer. Convert it to Clipping Mask by pressing Command/Ctrl + Alt + G. Use brush tool with low Opacity to paint white for highlight and black for shadow. Repeat this process carefully until we get natural lighting on the front bumper.
Step 16: Hide Original Car
Create new layer under the car's body. Paint black to cover the original car behind it.
Step 17: Intercooler
Next step is adding intercooler. Set foreground color to #5c5d5f. Activate brush tool with brush size 3 px. Draw a line by clicking once and Shift-click on other end of the line. Repeat this until we have some lines.
Step 18
Set foreground color to black. Draw big shadow covering the lines. Activate eraser tool with low Opacity. Erase some of the shadow until it looks natural.
Step 19
You may notice that there is a missing detail on its bumper. Let's leave it that way for now. First, we need to work on its side skirts.
 Step 20
Activate brush tool and set foreground color to #5d5d60. Draw side skirt.
Step 21
Create new layer. Hit Command/Ctrl + Alt + G to convert it to Clipping Mask. From now on, everything we paint will goes inside the side skirt. Paint white for highlight and black for shadow. Below you can see the progress in painting its shadow and highlight.
Step 22
After drawing side skirt, we can see that our front bumper is not low enough. Let's fix it by redraw the front bumper. Create new layer and convert it to Clipping Mask. Use brush tool to add some shadows and highlights.
Step 23: Rear Bumper
Use same technique to draw rear bumper.
Step 24
You can also notice that there is a red reflection on rear bumper. This reflection comes from traffic cone in the original photo.
Step 25
Use brush tool to draw thicker bumper. Make sure to sample color from other part of the car. We have cover this technique in Step 11.
Step 26: Air Scoop
Use brush tool to draw an air scoop. Make sure to add subtle highlight make it realistic.
Step 27: Car Hood
Select car hood and cover top part of the grilles. Sample similar color from other part of hood to make sure the result blends naturally.
Step 28
Paint shadow under the hood.
Step 29
Crete new layer and cover the rest of the grilles with black. Use brush tool to draw some gray lines
Step 30: Darkening Front Part of the Car
Currently front part of the car is too light. To fix this, add Adjustment Layer Hue/Saturation with below setting.
Step 31
Fill layer mask with black. Activate brush tool and set its hardness to 0%. Paint front part of the car with white. This way, the adjustment layer affects only front part of the car.
Step 32
Add Adjustment Layer Brightness/Contrast.
Step 33
Again, fill layer mask with black. Paint front part of the car with white.
Step 34
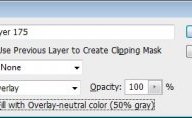
Activate brush tool. Set its Opacity to 50%. Paint gray on front part of the car.
Step 35
Change layer's blend mode to Overlay. Reduce its Opacity to 38%.
Step 36
Its front part is still too light. Create new layer again. Paint another gray on top of front part of the car. Change its blend mode to Multiply and reduce its Opacity to 22%.
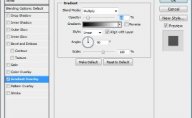
Step 37: Head Light
Select bottom and top part of the head light. Fill it with gradient from white to black. Change layer's blend mode to Screen. Set its Opacity to 50%.
Step 38
Select headlight. Click Add Layer Mask icon. This way, the gradient goes inside the head light. Below, you can the subtle difference before and after adding highlight.
Step 39
Select turn signal light. Add Adjustment Layer Hue/Saturation. Increase Lightness and Saturation slider.
Step 40: Front Tire
Activate brush tool and set foreground color to black. Draw front left tire.
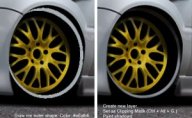
Step 41: Draw Custom Rim
Use pen tool and custom shape tool to draw spokes basic shape. For its color use #dbc01d. Add subtle Gradient Overlay from black to white. For more information on drawing rims for a car. Check out this tutorial.
Step 42
Duplicate spokes basic shape we have just created by pressing Command/Ctrl + J. Change its color to #4f4309. Place it under the original spokes. Reposition shape inside the rim until we get get a three-dimensional display.

RELATED VIDEO
RELATED FACTS
-
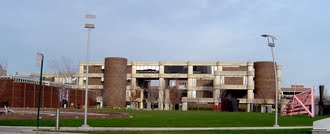 College for Creative Studies (CCS) is an art education institution in the United States and was cited by BusinessWeek as one of the 60 best design schools in the world. It is a private, fully accredited, four-year college located in Detroit, Michigan. CCS is...
- The University of Cincinnati College of Design, Architecture, Art, and Planning, commonly referred to as DAAP, is a college of the University of Cincinnati. Located in the university's main campus in Cincinnati, Ohio, DAAP is consistently ranked as one of the most...
-
Northview Heights Secondary School is a secondary school for grades 9 to 12 in Toronto, Ontario, Canada. It is located in the North York community in Toronto, on the intersection of Bathurst Street and Finch Avenue.
Its feeder schools include Charles H. Best Middle...
Share this Post
latest post
-
 Auto Designer salary July 4, 2026
 -
 Car design.com June 14, 2026
 -
 Automotive power supply Design May 25, 2026
 -
 Become a car Designer May 5, 2026
 -
 Car Design software online April 15, 2026
 -
 Car Designs March 26, 2026
 -
 Automobile, Vehicle March 6, 2026
 -
 Automotive Shop Design February 14, 2026
 -
 Cars Design January 25, 2026